Power And Reset
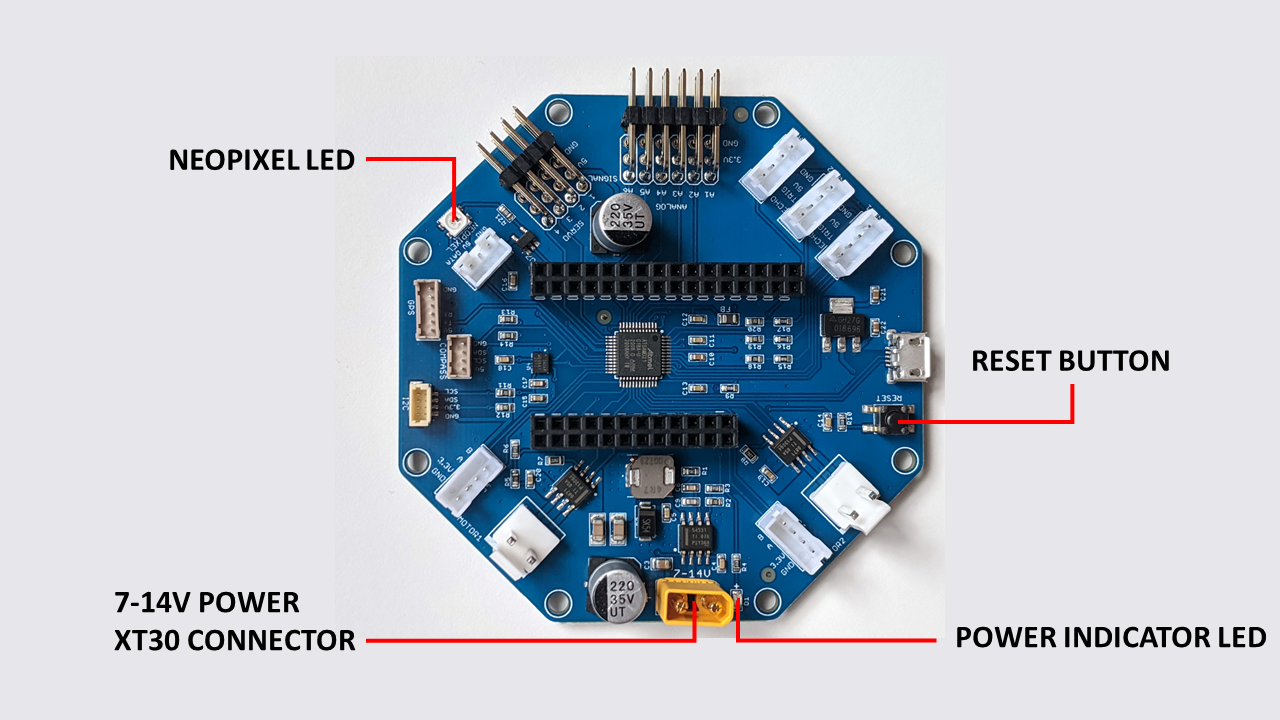
RoverWing power and reset connectors
Power Source
The board can be powered by a 7-14V DC power supply such as 2 or 3 cell LiPO battery or a 10-cell NiMH battery. There is a power indicator LED next to the power connector.
The battery port uses XT30 male connector, so it can be used directly with batteries with XT30 female connector. We also include an adapter for connecting batteries with XT60 connector, one of the most popular connectors for LiPo batteries used for quadcopters and RC cars. See section Cables for more information about available cables and adapters for connecting other types of batteries.
Note that the RoverWing can not be powered via USB cable plugged into the USB port on the board (this port is only used for updating firmware). Some components of RoverWing (namely, the microcontroller, the IMU, and analog inputs) can be powered from the attached Feather board, but for most peripherals (motors, servos, sonars), the 3.3V provided by Feather is not enough and a 7-14V power source is necessary.
Warning
The XT 30 connector is polarized, so it can only be plugged in one way. Because of this, there is no reverse polarity protection on the board. If you are making your own power cables, make sure to use the correct polarity, otherwise you will permanently damage the board!!
Also, connecting/disconnecting XT30 connector requires some force; if you are not careful, you could end up ripping the connector off the board. It is advised to plug in an XT30 extension cable (or XT30-XT60 extension included with the RoverWing) permanently and connect/disconnect the battery to the extension cable when needed.
The board has a 5V high-efficiency buck voltage converter which powers the sonars, Neopixel LEDs, servos, and a 3.3V linear regulator. The linear regulator in turn provides power to the Feather board (via 3.3V pin), built-in microcontroller, and IMU.
Note that 5V converter is capable of producing 4A output. Some of it is used by on-board electronics, leaving about 3.5A available for servos and NeoPixel LEDs.
Indicator LEDs
RoverWing contains two LED indicators. There is a small green LED next to the power connector; it lights up whenever RoverWing is powered.
In addition, RoverWing also contains an internal small NeoPixel LED next to the servo port. Normally it blinks green (about 4 times per second) to indicate that RoverWing firmware is running (except during the IMU calibration). If the battery voltage drops below preset limit, this LED turns red to warn the user. The battery level cutoff and LED brightness can be changed as described in RoverWing Library Guide. Other than that, the internal NeoPixel LED can not be controlled by the user.
Voltage Sensor
RoverWing includes an internal circuit for measuring power supply voltage,
which is then made available to the Feather board using getVoltage()
function of RoverWing Arduino library.
Reset Button
RoverWing contains a reset button next to the USB connector. Pressing this button resets both the RoverWing and the connected Feather board.
Pressing the reset button twice puts the RoverWing in boot mode, used for uploading new firmware as described here; in this mode, the internal NeoPixel LED is dimmed. To exit the boot mode, press the reset button once.